Get ready for a jam-packed weekend of events in Asheville. Across the city, enjoy live music, arts and crafts demonstrations, comedy shows, and, on Sunday, a festive Mardi Gras parade in the streets of downtown.

Asheville is experiencing a mild winter this year, and temperatures have remained above average. Take advantage by exploring the beautiful Blue Ridge Mountains, which have unobstructed views along many of the hiking trails this time of year. Check out our Asheville hiking guide for inspiration and ideas.

Planning a trip to Asheville is

How to Become a Sustainable Traveler in 2020

A solo male travelers backpacking in Southeast Asia
Posted: 2/17/2020 | February 17th, 2020

After years on the sidelines, sustainable travel has made its way to the forefront of the travel industry. Environmentally friendly travel is now one of the fastest-growing movements in the industry, and I, for one, welcome this trend. It’s an incredibly important topic that I’ve been writing about for years.

After all, why destroy what you love? No one wants to see paradise paved over. We all cringe when we return to an overdeveloped, polluted destination. None of us want to contribute to that.

Being an eco-friendly traveler is simply being a respectful traveler.

As we strive to become more environmentally conscious, the questions for travelers become:

Just how do we “green” our travels?

What can we do to lower our carbon footprint as we travel the world?

How can we better interact with the communities we visit?

What changes can we make that are actually helpful?

Flight shaming people is not the answer, but do we all just stay home and quit traveling?

Fortunately, there’s actually a lot we can do as travelers to reduce our ecological footprint while contributing to the sustainability of the communities we visit.

Here are 13 concrete ways to reduce your environmental impact as a traveler:
 

1. Stay Close to Home

Though the exotic is always appealing, travel doesn’t have to be about going somewhere far away. Travel is the art of exploration and discovery — and that can just as well be nearby. Find somewhere close to home you haven’t been, get in your car (or better yet, take the bus), and go visit. You never know what you’ll come across!

“X” is always the most interesting place on the map.
 

2. Make Greener Transportation Choices

If you can, try to travel by train or bus. Not only does this reduce your carbon footprint but companies like FlixBus, Megabus, and Greyhound always have some cheap tickets, so you can save money too.

And when traveling by car, consider offering rides to other travelers to lower your collective emissions and cut costs. Many people will be happy to chip in for gas if it saves them time, which means you can save money and lower your carbon footprint at the same time. Win-win! That will cut your per-person transportation emissions in half (if not more). Use platforms like BlaBlaCar, Couchsurfing, and Craigslist to find rideshares near you.

Avoid flying or driving long distances by yourself whenever you can.
 

3. Travel Slow

When we travel abroad, we have a tendency to rush around from place to place, trying to soak in as many sights as possible. I get that. After all, not everyone can be permanent nomads, and when you have limited time and aren’t sure if you’re coming back again, I can see why people “travel fast.”

However, not only does this raise your transportation costs since you’re moving a lot, you end up increasing your carbon footprint. All those trains, buses, and planes add up. The fewer you take, the better.

Additionally, being a good traveler not only means reducing your carbon footprint but also doing good by the communities you visit. Day-tripping brings in very little money to communities but impacts their infrastructure heavily (it’s why the city of Hallstatt in Austria is restricting day tours). So try to stay at a destination for a least a night.

Traveling to fewer destinations is good not only for your wallet and the climate, it’s good for local communities as well.

(Plus, slowing your travels will let you get to know places in a deeper way, since you’ll get to spend more time there. In travel, less can be more.)
 

4. Pack Smart

While the specifics of will depend on where you’re going, there are a few things you’ll want to bring with you to help you travel more sustainably:

  • Reusable water bottle – Nalgene makes durable bottles that are BPA-free and made in the USA.
  • Water filter – Many destinations don’t have potable water, which means you’re going to be using tons of single-use plastic. Instead, bring a Lifestraw or SteriPen. These devices will purify your water so you can drink from practically anywhere, ensuring you can avoid single-use plastic bottles.
  • Tote bag/stuff sack – If you’re traveling long-term, bring a tote back or an extra stuff sack. You can use them for buying groceries and avoid plastic bags. At other times, they can be used to keep your bag organized.
  • Diva cup – This is a reusable menstrual cup. While I can’t speak from personal experience, it’s something our resident solo female travel expert packs when she travels, since menstrual products are not always available (and can also be quite wasteful).
  • Utensils – Travel cutlery (a fork, knife, and spoon, or just a spork or a set of chopsticks) can come in handy if you’re on a budget and plan on cooking your own meals. But they’re also useful for street food and eating out, as you can avoid plastic cutlery.

Additionally, bring a small Tupperware container for leftovers. I always find myself with extra food when I cook in hostels. This helps avoid waste and provides food for the next day. It’s an amazing travel hack surprisingly few people make use of.
 

5. Fly with Fewer Connections

While I don’t believe in flight shaming, it’s impossible to deny that flying does have a hefty carbon impact. In addition to limiting your flying, try to use longer flights with fewer connections. Twenty-five percent of airplane emissions occur during takeoff and landing, which means if you fly shorter flights with more connections, your emissions will be drastically higher.

Flying direct is simply the better option environmentally, so opt for that whenever possible.
 

6. Avoid Overvisited Destinations

If you can, avoid cities grappling with overtourism. You’ll find fewer crowds and lower prices, and you also won’t be putting as much strain on local communities struggling to keep up. (And, from a sheer personal-enjoyment point of view, who wants to deal with crowds or long lines? No one.)

If you do visit overtouristed places, such as Venice, Amsterdam, or Barcelona, pick a hotel or hostel instead of using sites like Airbnb. Apartment rentals drive up rents for locals and force them out of the city center. Unless you’re going to share accommodation with a local by renting a room from them (or using Couchsurfing), stick to hotels and hostels. Airbnb and similar sites really are detrimental to cities that don’t have a lot of housing.
 

7. Take Public Transportation

After walking, public transportation is the next best way to explore new destinations. On arrival, head to the local tourism office to learn about the options (as well as any visitor discounts available for public transit).

If you do need a taxi, use ridesharing apps instead. Uber and Lyft have a “pool” option in many cities, which lets you split your ride with other travelers. While it may take a little longer to get to your destination, it will save you money and ensure that your ride is as eco-friendly as possible.

When it comes to longer distances, budget buses are your best way of getting around, since they usually pack in a lot of passengers. Megabus and FlixBus are two of the most popular options.


8. Eat Local

Food that is imported has a much higher carbon footprint than locally grown food (and it’s usually not as fresh either). To keep your carbon footprint down, eat like a local. Stick to foods that are grown locally, and avoid packaged and imported foods much as possible. This will ensure that you’re eating seasonal produce, which not only is going to be the freshest but will also support the local economy. (Also, stick to organic food if you can.)

Sure, the odd Western comfort meal is not the end of the world, but the more you eat locally, the more you reduce your environmental footprint and the more you help the local economy as well. After all, you didn’t come to Thailand to eat a burger you could get at home, right?
 

9. Cut Back on Meat and Dairy

I’m not saying you need to go vegan. I love meat and never plan to give up bacon. But if you’re concerned with the impact of your food, reducing your meat and dairy intake is extremely helpful. Over 25% of global greenhouse gas emissions come from food — and the majority of those emissions are from animal products. So by cutting back on your meat and dairy consumption, you’ll drastically reduce your carbon footprint. (Avoid Brazilian beef if you can, as lot comes from cleared rainforest land. Cattle ranching is the #1 cause of rainforest deforestation in the world. Same for soy too.)

Plus, it’s never been easier to travel as a vegan or vegetarian, as there are tons of amazing restaurants out there — as well as apps to help you find them (you can download the HappyCow app to find the best vegan and vegetarian options near you).

Even if you take meat and dairy out of one meal a week, you’ll be moving the needle in favor of a lower carbon footprint and a more ethical diet.
 

10. Avoid Animal Attractions

Part of traveling green is helping the other creatures that inhabit his earth. That means you should avoid any and all attractions that use captive wild animals for entertainment. The most common offenders are riding elephants, swimming with dolphins, visiting captive whales, and petting (drugged) tigers. These activities require animal abuse and imprisonment and should be avoided.

Animals are best viewed in their natural habitats. If you want to see them, go on a safari, jungle hike, or whale-watching tour and see the animals where they belong, in the wild.

If you want to be an ethical and responsible traveler, stick to taking photographs and avoid direct interactions with animals.

For more information on animal tourism and how to avoid it, check out these helpful organizations:


11. Reduce Your Plastic Use

I hate plastic. It creates a ton of waste. From plastic bottles to toothpaste tubes to shopping bags, plastic sucks. I admit I’m not perfect, and I still use too much, but I’m always trying to reduce my consumption (both at home and abroad).

Avoiding plastic as much as possible is a great way to reduce your environmental impact. You can buy a reusable water bottle, use toothpaste tabs, carry your own cutlery, and travel with a canvas bag for starters.

Additionally, skip the plastic straws and cutlery and avoid getting take-out unless it comes in biodegradable containers. Straws can take 200 years to biodegrade, and plastic bags take 20. Don’t let a few minutes of convenience endanger the planet. Skip the plastic.
 

12. Cut Back on Cruises

Cruises are one of the worst offenders when it comes to carbon footprints and overtourism. Taking a cruise has the same average per-person carbon footprint as flying from London to Tokyo — round-trip. That’s almost 20,000 kilometers (12,500 miles)!

Thanks to cruises, carbon emissions in popular port cities can be so high that thousands of people actually die prematurely every year.

And to top it all off, day-trippers from cruises visits are overwhelming local economies, driving up prices, forcing out locals, and creating destinations that are over-reliant on tourism.

Don’t get me wrong: cruises are a fun way to travel. But if you’re looking to lower your environmental footprint, you’ll want to avoid cruises as much as possible.
 

13. Take a Nature-Related Trip

Travel is one of the best personal development tools there is. It opens you up to a whole new world and widens your perspective of so many things — people, culture, history, food, and so much more.

If you want to better understand and appreciate the natural world, try taking a trip with the sole purpose of connecting with nature. Head to the Australian Outback, go diving and swim around coral reefs, visit national parks, camp in the Moroccan desert, stay a few weeks in a town with little or no electricity, canoe down the Amazon River, or spend a few nights under the stars in a field close to home.

Do something that gets you in touch with the world in a way that sitting at home with all the electricity and free-flowing running water doesn’t. I promise that when you come home, you’ll have a new perspective on why we’re all so focused on being environmentally friendly these days.

It doesn’t take much to see that we are living unsustainably and something’s got to give. Going on a nature adventure can get you to think differently when it comes to the environment and how important it is for us to treat it well.

***

Traveling in a more green and eco-friendly way is something we should all aspire to. As travelers, it’s our responsibility to make sure that, while we explore the globe, we do so in a way that doesn’t harm the planet or the local communities that we visit.

With a few simple changes, you can all become better and more sustainable travelers. You just need to take that first step. Action begets action, and the more actions you take, the easier the other ones will be.

Book Your Trip: Logistical Tips and Tricks

Book Your Flight
Find a cheap flight by using Skyscanner or Momondo. They are my two favorite search engines, because they search websites and airlines around the globe so you always know no stone is being left unturned.

Book Your Accommodation
You can book your hostel with Hostelworld as they have the largest inventory. If you want to stay somewhere other than a hostel, use Booking.com, as they consistently return the cheapest rates for guesthouses and hotels. I use them all the time.

Don’t Forget Travel Insurance
Travel insurance will protect you against illness, injury, theft, and cancellations. It’s comprehensive protection in case anything goes wrong. I never go on a trip without it, as I’ve had to use it many times in the past. I’ve been using World Nomads for ten years. My favorite companies that offer the best service and value are:

Looking for the best companies to save money with?
Check out my resource page for the best companies to use when you travel! I list all those I use — and they’ll save you time and money too!

The post How to Become a Sustainable Traveler in 2020 appeared first on Nomadic Matt's Travel Site.

Swing Bed Cushions

I’m so excited that I’ve made progress on getting our swing bed up and going for this coming season, so today I’m sharing the new swing bed cushions I bought and how they worked out. I did a lot of searching online for the best price and company to buy from for the swing bed. The bed holds a standard twin sized mattress, so I looked online for that size and ended up on Etsy where there were several sellers who had swing bed cushions and pillows.

The post Swing Bed Cushions appeared first on Southern Hospitality.

Home Style Saturday 178

HI, friends! We are working away on the bathroom this weekend. Hope you’ll stop by for Home Style Saturday today! 

The post Home Style Saturday 178 appeared first on Southern Hospitality.

The Ultimate Guide to Teaching English in Thailand

The skyline of Bangkok, Thailand
Posted: 2/15/2020 / February 15th, 2020

Thailand is an English teacher’s dream. With a low cost of living, incredible food, rich culture, plenty of partying, and a mai pen rai (no worries) attitude, the Land of Smiles is a very popular country for English teachers.

For Thais, English is considered a necessity to work in the global market, so there is always a need for teachers. With language schools, primary schools, universities, and other locations offering English classes, there are numerous avenues for employment.

So, how do you get a job teaching English in Thailand?

In order to do so, you need to be a native speaker from an English-speaking country (defined as the US, Canada, the UK, Ireland, Australia, and New Zealand) or prove your fluency, and have a bachelor’s degree.

Because of the popularity of teaching English in Thailand, I’d recommend also having a 120-hour TEFL, TESOL, or CELTA certificate to make you more competitive.

With all teaching opportunities in Thailand, salaries vary greatly depending on the location and employer. In hot tourist destinations like Koh Samui, Phuket, and other spots, expect to earn less than what you would make in less exotic locales, because people will accept a lower salary in exchange for the beach lifestyle.

You will earn the most in Bangkok, followed by Chiang Mai.

Here’s a breakdown of the various ways to teach in the country and what to expect with each position:
 

Public Schools

Public schools are free from preschool through high school. The school year begins in May and ends in March and includes a three-week break in October.

As a public school teacher in Thailand, expect to work full-time, even if you’re not teaching every moment of the day. Responsibilities range from creating lesson plans and exams to grading papers (none of which you are compensated for if it’s on your own time), as well as keeping office hours at school.

Students range in their knowledge and understanding of English, and often there is little guidance in terms of the curriculum you need to create. You’re basically on your own here! Many teachers incorporate games, television shows, and movies into their classes.

In public schools, the student-to-teacher ratio is high, so expect large class sizes.

Salaries range from 25,000 to 40,000 THB ($827–1,317 USD) a month. Teaching in the cities will earn you the most money. You can expect lower salaries in the countryside, but cost of living is so cheap there, you’ll still end up having plenty of extra money!

a solitary Thai student smiling for the camera

Private and International Schools

There are very few differences between public schools and private and international schools, other than the lower student-to-teacher ratio and the fact that salaries are significantly higher since they are not free to attend.

International schools have the most coveted positions, but you’ll need to be an actual certified teacher to get one of them, as the curriculum follows the West’s. Private schools are a little less strict, but you’ll still want to have some experience. You’ll need to have not only a degree but also a TEFL, TESOL, or CELTA certificate and prior teaching experience, and be a native English speaker.

If you’ve never taught English before or have only a little experience, you’re unlikely to get a job at one of these schools.

Whereas the public schools follow the Thai system and come with little support, these institutions tend to be more like Western schools, so if you’re wondering what teaching is like there, just think back to what it was like when you went to school!

International schools pay the most, roughly 80,000–170,000 THB ($2,633–5,596 USD) a month (which is well above the typical Thai salary and allows for your lifestyle to be more lavish); private schools pay 60,000–80,000 THB ($1,975–2,633 USD).

These positions also come with a lot of perks: contract bonuses, lots of vacation days, health insurance, and sometimes airfare to and from Thailand.
 

Universities

Teaching at a university in Thailand can help give you an edge over the competition for other English teaching jobs in the country. But teaching at a university means teaching part-time and earning only 30,000–60,000 THB ($987–1,975 USD) a month.

The upside is that you can also teach at another school part-time, you get a few months of paid vacation, and you are compensated generously should you have to work overtime (about 1,000–1,500 THB, or $33–49 USD, an hour).

Depending on where you teach, your responsibilities will be different. All teachers must come up with lesson plans, but some may also have to teach faculty or have additional sessions outside of the classroom, among other duties.

You may or may not have textbooks to use for your curriculum. Class sizes at universities are notoriously large, about 50 students.
 

Language Schools

Teaching English at a language school in Thailand is different than at a public or private school. Classes are normally held in the morning before the workday starts to accommodate businesspeople, then again in the afternoon and into the evening for children and adults.

The workweek at language schools extends into the weekend.

At language schools, classes are small and range from four to ten students. As a teacher, it’s your responsibility to come up with lesson plans and activities.

There’s also the option at language schools to work full- or part-time. Full-time teachers make anywhere from 30,000 to 40,000 THB ($987-1,316 USD) per month; part-time teachers make 350–500 THB ($11.50–16.50 UD) per hour.

There are lots and lots of language schools in the country, and jobs are fairly easy to get. They don’t really care about previous experience or even if you have a TEFL certificate (though having both makes it easier to get a job).

You’ll also get very little support from the schools and will basically have to set up everything on your own. You’ll only get paid for actual classroom time.

I didn’t really love teaching at the language schools, but the work was easy even if it was not well paid.

A massive Buddhist temple in Thailand

Corporate Training Programs

As a corporate teacher, you teach from a company’s office, giving lessons to their staff. Classes tend to be large, so many employees can attend. Because these programs are quite expensive, the positions are only filled by teachers with experience.

Expect to work during the morning or late at night, as you have to teach people outside business hours.

Corporate teachers make anywhere from 45,000 to 60,000 THB ($1,481–1,974 USD) a month, and it’s normal for the school to cover travel expenses to the company.
 

Test Preparation

Test preparation in Thailand is different than in other English positions. You must be knowledgeable in a variety of English tests, including SAT or GRE prep (and have finished in the 95th percentile or above), as well as IELTS and TOEIC, both of which are used to test students before they work or study abroad.

As a test prep teacher, classes are either groups or private and take place on both weekdays and weekends. It’s your job to not only teach the courses but also design and develop the course curriculum.

Test prep teachers average about 600 THB ($20 USD) an hour.
 

Best Job Resources for Teaching in Thailand

There are numerous sites to find jobs teaching English in Thailand. The best one for jobs is ajarn.com as it simply has the most listings and is specific to Thailand. It’s the oldest teaching in Thailand website too.

Other sites with job postings include the following:

How to Apply for a Visa

It isn’t hard to apply for the Non-Immigrant B visa necessary to teach English in Thailand and your school will help you do, but there are quite a few steps to getting it and then starting teaching.

First, make sure your passport has validity beyond six months and have passport photos for applications, as well as your original bachelor’s degree, transcripts, and a certified criminal background check.

Next, you’ll need to apply for a visa from outside of Thailand and include a letter from your employer with the job offer. Once you have your visa, your employer steps in and handles the paperwork, completing the remainder of the application on your behalf.

After the visa is complete, you’ll need to have a physical exam and a medical certificate from a Thai doctor and then get your work permit. From there, it’s on to the Immigration Department in order to extend your visa in your passport for 12 months.

The last two steps are to get your tax card from the Tax Department and then your teaching license. Your employer should be able to assist you in all aspects of the process.

It’s important to note that if you choose to teach without these necessary items, you run the risk of getting kicked out of the country and fined.

***

Teaching English in Thailand is one of the best teaching opportunities in the world, thanks to the country’s cost of living, tropical environment, and laid-back lifestyle.

With so many options for teaching and the ease of getting a visa, it’s a perfect spot to start your English teaching career abroad.

P.S. – Want to meet other travelers in real life? This year we launched The Nomadic Network, a platform created to help travelers connect, learn, and get inspired in real life! Here are our upcoming events if you want to take part: Seattle (2/17), Austin (2/18), Fort Lauderdale (2/19), Portland (2/19), San Francisco (2/20), Los Angeles (2/23), Detroit (2/24), Boston (2/24), Dublin (2/24), San Diego (2/24), London (2/25), Chicago (2/25), and NYC (3/10).


Ready to Teach Overseas? Get My Comprehensive Guide

This digital guide will put you ahead of your competition, help you land a high-paying job with a reputable company, and give you first-hand knowledge from real teachers! Get started today with this downloadable PDF (for your computer, e-reader, or mobile device) with the book PLUS 12 interviews about life as a teacher, plus job advice from one of the industry’s top recruiters!

Book Your Trip to Thailand: Logistical Tips and Tricks

Book Your Flight
Find a cheap flight by using Skyscanner or Momondo. They are my two favorite search engines because they search websites and airlines around the globe so you always know no stone is left unturned.

Book Your Accommodation
You can book your hostel with Hostelworld. If you want to stay elsewhere, use Booking.com as they consistently return the cheapest rates for guesthouses and cheap hotels.

Don’t Forget Travel Insurance
Travel insurance will protect you against illness, injury, theft, and cancellations. It’s comprehensive protection in case anything goes wrong. I never go on a trip without it as I’ve had to use it many times in the past. I’ve been using World Nomads for ten years. My favorite companies that offer the best service and value are:

Looking for the best companies to save money with?
Check out my resource page for the best companies to use when you travel! I list all the ones I use to save money when I travel – and I think will help you too!

Looking for more information on visiting Thailand?
Check out my in-depth destination guide to Thailand with more tips on what to see, do, costs, ways to save, and much, much more!

The post The Ultimate Guide to Teaching English in Thailand appeared first on Nomadic Matt's Travel Site.

Feature Friday: A New Plantation Style Home in FL

Happy Friday friends! Today’s Feature Friday is a beautiful new build in Winter Garden, FL. Robyn sent in pictures for me to share her home and it’s a stunning 7 bedroom home, close to 8,000 s.f. She says all their inspiration cam from plantation homes throughout the South. A muralist completed a fruit of the Spirit tree in the girls’ hallway, which you’ll see below. They have a lot of custom, creative features that made the project fun for the whole family, including a locker area with a water fountain. This home was 2 years in the making and it was designed with the help of a custom builder and architect. 

Enjoy the tour!

The post Feature Friday: A New Plantation Style Home in FL appeared first on Southern Hospitality.

Cape Town Itinerary: What to See and Do in 4 (or More) Days

An aerial view of Cape Town from the mountains
Posted: 2/13/2020 | February 13th, 2020

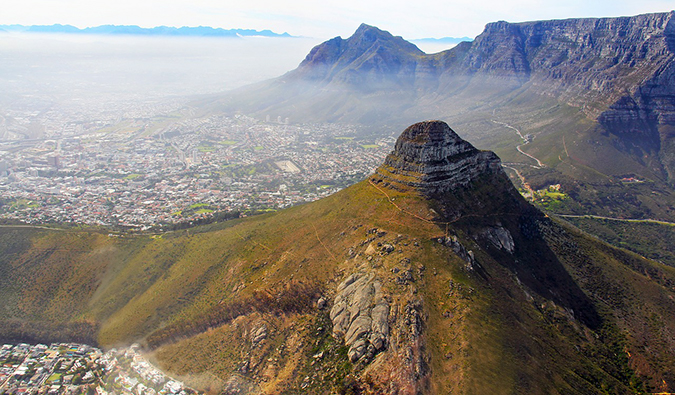
Cape Town is one of those places I can never get enough of. Its natural beauty, climate, people, chill atmosphere, and delicious food scene always make my visits memorable.

Backed by Table Mountain, Cape Town is really one of the most beautiful cityscapes in the world.

There’s a lot to see and do in the city, so to help you make the most of your trip, here is my suggested itinerary for four (or more) days.


Cape Town Itinerary: Day 1

Table Mountain in Cape Town during a colorful sunset
Take a Free Walking Tour
For a thorough introduction to Cape Town, I recommend taking at least one free walking tour. As you know, I always do that when I arrive in a new city, to help me get a sense of the destination’s culture and history and orient myself. Some of my favorite walking tours are:

Just be sure to tip your guide at the end, as that’s how they make their living.

Explore the City Center
Your next stop should be Cape Town’s city center. You’ll find all kinds of shopping, cafés, restaurants, and markets along Long Street. Take several hours to explore and see it all. To see more of Cape Town’s eclectic neighborhoods and get a feel for the local pace of life, here are some specific areas worth exploring:

  • Green Market Square – Right off Long Street, this is a perfect place to find local handicrafts and souvenirs. There are all sorts of crafts and gifts here. Don’t be afraid to haggle for a good deal!
  • Victoria and Alfred’s Waterfront – This is another impressive shopping locale, with a large variety of shops and entertainment. It’s on the historic working harbor, the architecture is quite charming, and it’s extremely popular with both tourists and locals alike. Grab a seat on a waterfront restaurant’s balcony, have a drink, and soak up the atmosphere.
  • Bo-Kaap – Not far from the city center is Bo-Kaap, a colorful Muslim neighborhood. This area, previously the home of Cape Town’s slave population, is known to be quite Instagram friendly (you’ve likely seen it on IG already!). Each home is painted a different color and you can tour the area on your own (although you’ll probably enjoy it a lot more if you take a free walking tour). If you don’t tour with a group, be sure to get a overview of the area’s history at the Bo-Kaap Museum. It’s small, but the staff is quite friendly and super knowledgeable. Admission is 20 ZAR ($1.36 USD) per person.
  • De Waterkant – A nice place to spend the evening is the De Waterkant neighborhood. Not far from Bo-Kaap, this trendy area (think NYC’s Greenwich Village) is the perfect place to stroll, window-shop, and enjoy an upscale dinner. The architecture is quite stylish in what is Cape Town’s “pink” (gay-friendly) district. The Cape Quarter shopping mall is here as well.
  • Woodstock – This is one of the coolest neighborhoods in Cape Town. In recent years, it’s become a hub for art galleries, co-working spaces, breweries, and hip restaurants. What was once an old, rundown industrial area is now one of the coolest places in town.

Visit Table Mountain
A visit to Cape Town isn’t complete without taking in the view from Table Mountain. It’s a bit of a walk up there, but it’s totally worth it. The shortest trail takes about two hours, but if you’re short on time, you can take the cable car, which takes about five minutes each way (it’s a bit pricey at 330 ZAR ($22 USD) for a round-trip ticket, though). Up top, you’ll have a 360-degree view of Cape Town, the harbor, the mountains, and the beaches. Try to come up during sunset, or if you can, bring some food and drink and have a picnic!

Keep in mind that the clouds can move in really fast here, so be sure to check the weather before you hike up.

I suggest hiking up and then taking the cable car down if you’re short on time. If you want to extend your stay, hike both ways and spend some time relaxing and taking in the view. If you pack some water and snacks, you can easily make this a full-day activity. There are shops at the summit as well as several other hiking trails to explore if you’re looking to work up a sweat.

Note: I put this at the end of the day so you can do the walking tours in the morning, but you can also make this a full-day activity if you want! It’s worth taking it slow here if you have the time.
 

Cape Town Itinerary: Day 2
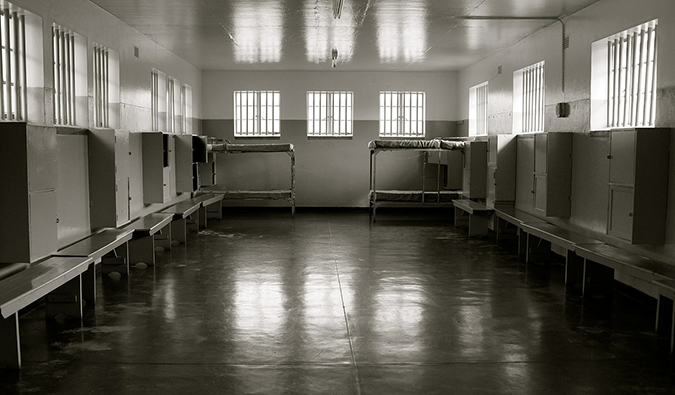
black and white photograph of the jail where Nelson Mandela was kept
Visit Robben Island
Hop on a ferry from the Victoria and Alfred Waterfront and head to Robben Island, located about 8km from shore, where Nelson Mandela was imprisoned for 18 of his 27 years behind bars. Declared a UNESCO Heritage Site in 1999, the museum is an important symbol in South Africa, representing the triumph of democracy over apartheid. The tour guides are former prison inmates, and you can to sit in the cells where the political prisoners once lived.

No visit to Cape Town is complete without coming here. Do not skip this!

Ferries operate three times a day, starting at 9am (a fourth ferry operates during the summer season). Admission is 320 ZAR ($22 USD) for adults and 200 ZAR ($13.50 USD) for anyone under 18, which includes the ferry ride. Expect the entire trip to take at least four hours.

Visit Kirstenbosch Garden
Located in the southern suburbs, these gardens were established over 300 years ago and have more than 22,000 types of plants found on the African continent. Spanning over 1,300 acres, this is unlike any other botanical garden you’ve seen! Be sure to do the tree canopy walkway. There are restaurants and cafés on-site, but they are expensive, so I’d bring your own food and have a picnic on the grounds.

Rhodes Drive, Newlands, +27 0800-434-373, sanbi.org/gardens/Kirstenbosch. Open daily 8am-6pm (7pm in the summer). Admission is 70 ZAR ($5 USD) per person (discounts available for students and children).

Watch the Sunset from Lion’s Head
Table Mountain’s little sister, Lion’s Head, is perfect for an evening hike. It takes just 45 minutes to hike to the top, so time your trek so you’re at the peak for sunset. It’s one of the most scenic spots in town. Also, remember a flashlight for the trek back down.
 

Cape Town Itinerary: Day 3
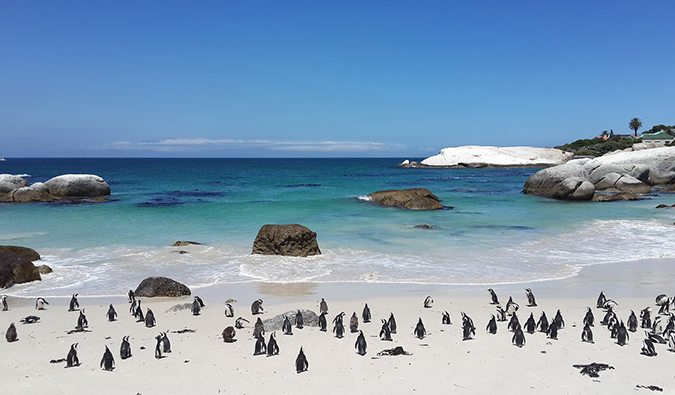
penguins at Boulders Beach, just outside of Cape Town
See the Penguins
While you’re in Cape Town, you won’t want to pass up seeing the area’s cutest inhabitants: African penguins! This colony is home to over 3,000 penguins. They live at Boulders Beach Park, and you can view them from a raised boardwalk (further down the beach you can swim with them if you’re really bold — expect freezing water!). Just keep in mind that they are wild animals. The beach is their home, not yours — so keep your distance and don’t try to feed or pet them. They are wild animals after all.

Visit Slave Lodge
Built in 1679, this is one of the oldest remaining buildings in Cape Town. It is where the Dutch East India Company housed their slaves until 1811. Over 60,000 African and Asian slaves were brought to the city, and almost 300 men and women were forced to reside in the lodge at a time. Today, the lodge is a museum where you can learn about the hardships slaves faced in their daily lives in Cape Town.

Corner of Adderley Street and Wale St, +27 2- 467-7229, slavery.iziko.org.za/slavelodge.

Tour Parliament
Take a tour of the parliament of South Africa and learn about South African politics — including how the country was governed during the apartheid era. Dating back to 1884, the Houses of Parliament are National Heritage Sites; the original building was granted approval by Queen Victoria when Cape Town was a British colony.

Today, they host daily hour-long tours during the week, and you can even book a spot (at least one week in advance) to watch debates if you’re interested.

120 Plein St, +27 (021) 403 2266, parliament.gov.za/visiting-parliament. Tours are held daily, but advance booking is required. Admission is free.

Hike Signal Hill
For some beautiful sunset views, hike up to the top of Signal Hill. The climb is tiring and takes around 90 minutes, but the views are worth it (you can also drive or take a taxi up to the top). You’ll get a sweeping vista of Cape Town, including a view overlooking Table Mountain too. Just be sure to give yourself lots of time, so that you don’t miss the sunset.
 

Cape Town Itinerary: Day 4

The famous Muizenberg Beach in South Africa
Visit the District Six Museum
In 1867, District Six was established for freed slaves, immigrants, and marginalized individuals. Under apartheid (1948–1994), the district was declared a “white area” and the existing residents were forced out. Over 60,000 people were forced from their homes, and this museum highlights their struggles and stories. It provides important context to the city’s modern history and ongoing struggles.

25A Albertus St, +27 21-466-7200, districtsix.co.za. Open Monday-Saturday 9am-4pm. Admission is 45 ZAR ($3 USD) or 60 ZAR ($4 USD) for a guided tour.
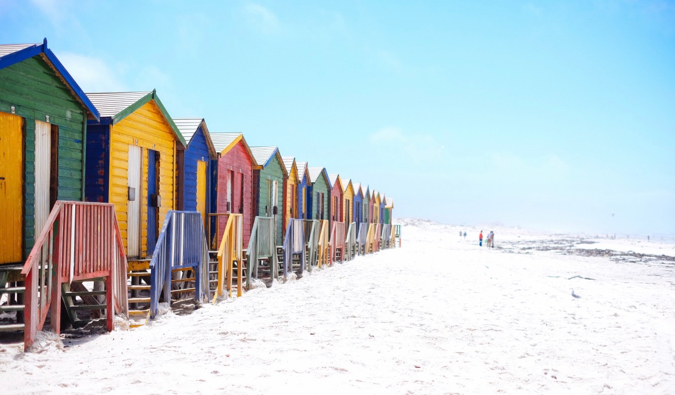
Hit the Beach
Cape Town has some incredible beaches, so make sure you spend at least part of a day on one of them. Clifton Beach is probably the most popular. The sand is super white and the water a bright blue. Unfortunately, it’s cold pretty much year-round, so don’t expect warm tropical waters. The scenery is gorgeous though, with the mountains behind you and mansions and upscale restaurants lining the beach road.

Another option is Muizenberg Beach, which is a 30-minute drive from the city center. This beach has a famous boardwalk and is great for surfing.

Check Out the Wildlife
If you head down Muizenberg Beach, be sure to stop at Hout Bay. This harbor is home to tons of seals and seabirds. If you’re visiting between June and November, keep your eyes peeled for the migrating whales. Right whales, humpback whales, Bryde’s whales, and dolphins can all be found here.

If you’re looking for a meal, the fish and chips in this area of town are to die for. And don’t miss the Bay Harbour Market on the weekend: vendors sell everything from fresh fish to jewelry to local art, and there are often live bands too.

Explore the South African National Gallery
The Iziko South African National Gallery is home to an extensive collection of both South African and African art, as well as English, Dutch, and French pieces. The collection focuses on works from the 17th to 19th centuries, including paintings, sculptures, sketches, and lithographs.

They also facilitate an ever-changing rotation of contemporary artwork from both locals, as well as visiting exhibitions from across Africa and around the world (visit the website to see what temporary exhibitions are available during your visit).

Additionally, the gallery has a lot of insightful information about art and censorship during apartheid.

Government Ave, +27 21 481 3970, iziko.org.za. Open daily 9am-5pm. Admission is 30 ZAR ($2 USD).
 

Cape Town Itinerary: Day 5 (or More!)

a fishing boat in Kalk Bay at sunset, South Africa
If you have more than four days in Cape Town, here are some other fun things to see and do during your trip. Most of these will take you out of the city, so you can see more of this beautiful region of the country. Consider renting a car to make things easier!

Visit Kalk Bay
This fishing village makes for a nice spot to go window-shopping (or actual shopping if you want some souvenirs). There are plenty of seaside cafés you can relax in for a few hours, away from the busy city center.

Journey to the Cape of Good Hope
The Cape of Good Hope is where the Atlantic and Indian Oceans meet, and the drive there from Cape Town is one of the best on the continent. You’ll want to take the route along Chapman’s Peak, a winding and scenic road along the Atlantic coast. It’s a toll road, but the views are very much worth the price.

The Cape of Good Hope is located in Table Mountain National Park, which stretches all the way from Table Mountain in Cape Town to the tip of the continent. This nature reserve is home to numerous birds and animals, including antelope, Cape mountain zebra, eland, and baboons. Keep in mind that, while the baboons may look cute, they are still wild animals, so be careful around them and keep your food secured and out of sight.

There is a lot to see, so plan for a full-day excursion. If you don’t have your own car, you can book a tour with the Cape Point Explorer for 740 ZAR ($50 USD).

Enjoy Some Wine
If you love wine, head to the Stellenbosch area. If you have a car, it’s just 45 minutes outside of the city and is home to hundreds of vineyards. The wine from this region is world-famous, and the scenery is breathtaking, offering towering mountains and lush valleys. Tastings typically run about 60-75 ZAR ($4-5 USD), and food pairings are available as well. Some suggested wineries to check out are:

  • Spier Wine Farm (one of the oldest in the region)
  • Marianne Wine Estate (offers a classic French winery experience)
  • Waterford Wine Estate (they pair their wines with decadent local chocolates)

If you don’t have a vehicle and want to take a tour, expect to pay at around 1,000 ZAR ($68 USD) per person for a half-day tour of the region and its wineries. Many hostels run their own tours to the region or have partnerships with local tour guides who can take you as well. Be sure to shop around!

Learn to Surf
Cape Town is a super place to learn how to surf (though it’s also terrific for experienced surfers). Surfer’s Corner at Muizenberg Beach is known for its beginner waves, and there are plenty of surfing schools around where you can rent a board and take lessons. Expect to pay around 500 ZAR ($34 USD) per person for a 2-3-hour lesson.

***

Cape Town is one of my favorite cities on the African continent. With its terrific hikes, beautiful scenery, and important history, Cape Town has something for everyone. And, thanks the rand’s value, it’s affordable enough, so it’s easy to visit without breaking the bank.

Let this Cape Town itinerary help you make the most of your visit there.

Map of Activities

P.S. – Want to meet other travelers in real life? This year we launched The Nomadic Network, a platform created to help travelers connect, learn, and get inspired in real life! Here are our upcoming events if you want to take part: Seattle (2/17), Austin (2/18), Fort Lauderdale (2/19), Portland (2/19), San Francisco (2/20), Los Angeles (2/23), Detroit (2/24), Boston (2/24), Dublin (2/24), San Diego (2/24), London (2/25), Chicago (2/25), and NYC (3/10).

Book Your Trip to Cape Town: Logistical Tips and Tricks

Book Your Flight
Find a cheap flight by using Skyscanner or Momondo. They are my two favorite search engines, because they search websites and airlines around the globe, so you always know no stone is being left unturned.

Book Your Accommodation
You can book your hostel with Hostelworld as they have the most comprehensive inventory. If you want to stay somewhere else, use Booking.com, as they consistently return the cheapest rates for guesthouses and hotels. My favorite places to stay in Cape Town are:

  • The Backpack Cape Town – A fair-trade hostel with a swimming pool and garden, as well as activities most nights. They do a lot of good work for social change!
  • Ashanti Lodge Gardens – You can hang out at the pool or the landscaped gardens here, or in the awesome Kumasi Bar, with its views of Table Mountain. They have a great bar menu too!
  • 91 Loop – When you stay here, you get a free breakfast, free city walking tours, the opportunity to take part in organized activities, and discounts on the Honey Badger restobar.

Don’t Forget Travel Insurance
Travel insurance will protect you against illness, injury, theft, and cancellations. It’s comprehensive protection in case anything goes wrong. I never go on a trip without it, as I’ve had to use it many times in the past. I’ve been using World Nomads for ten years. My favorite companies that offer the best service and value are:

Looking for the best companies to save money with?
Check out my resource page for the best companies to use when you travel! I list all those I use to save money — and I think they will help you too!

Looking for more travel tips for South Africa?
Check out my in-depth South Africa travel guide for more ways to save money, tips on what to see and do, suggested itineraries, informational reading, packing lists, and much, much more!

The post Cape Town Itinerary: What to See and Do in 4 (or More) Days appeared first on Nomadic Matt's Travel Site.

Fashion over 50: Boots, Jeggings and Sweaters

We finally got a little more cold weather this week and it was a good time to get out the boots again. I’ve hardly worn my tall boots this winter because the weather has mostly been warmer than normal. But this week, the cold snap made me want to keep my feet warm and there’s no better way to have warm feet than cozy socks and boots.

We had a great weekend and if you saw my Instagram stories last weekend you know that I got to cross a fun bucket list item off and Mark and I went to see the Eagles Lives in concert here in Atlanta. It was a moment! I’ve loved the Eagles for so long and have sang along to their music. Still know the words to so many of their songs. The whole arena was singing along and it was great. So many Boomers in one spot enjoying the soundtrack of our youth and a time I will never forget. With over 3 hours of music, it was a fantastic show! Have you seen them?

The post Fashion over 50: Boots, Jeggings and Sweaters appeared first on Southern Hospitality.

1st, 2nd or 3rd cuttings in hay… what does that really mean?

With hay prices in California being $25 a bale (YIKES!) I have to purchase my hay twice a month.  Oh Goody.

Anyway, I previously was able to buy in bulk and therefore I could go directly to a trusted grower, look at his fields and know his quality and also know that he would harvest keenly, and I never had to worry about the quality of the hay.

Now, I do.

Now I have to go to the local feed store and buy not in bulk.  I arrive at the feed store and look up at the huge white board that has all the different forages available that day, the weight per bale and the ‘cutting’.

??

Why would the ‘cutting’ matter?

Previously, all of the year’s worth of hay I received from my grower looked/felt/smelled/fed exactly the same.  Did I simply buy all of one ‘cutting’?  If so, which cutting was it?  What is a ‘cutting’? Don’t farmers grow crops in a consistent manner so that the ‘cutting’ wouldn’t matter?  Don’t they use rules to harvest – no matter the season?

This ‘cutting’ concept didn’t make any sense.  After all, we don’t buy corn per ‘cutting’.  Or lettuce, or wheat or any other grain crop (which they are all grown in long seasons).

And, to confuse me even more, all of my orchard hay has been different, each delivery.  Every single time I have had “orchard grass” hay delivered from the local feed store – it is completely different from the last delivery in weight, shape, color, leaves, stems….

Clearly, I am receiving hay from different growers who have different harvesting styles.

So, I don’t think it is the ‘cutting’… I think it is the grower and his system.

Hmmmm.  I wished to test my theory.

I wish I could get my hay from one grower again...

I wish I could get my hay from one grower again…

LOOKING INTO THE ‘CUTTING’ ISSUE.

Well, I think my general farming thought is correct.  Forage should be farmed consistently, no matter what the season/time of year or cutting.    Hay is just like any other crop…  there are rules and methods… and many different farmers.

Here is information that I gleaned through my search:

STANDLEE PREMIUM WESTERN FORAGE (no affiliation):

Click to go to site

Click to go to site

CHERRY HILL ANSWERS THE ‘CUTTING’ QUESTION

Cherry Hill is known for her horsekeeping.  Here is what she had to say (linked here):

Hay Cuttings
     Horsemen are very opinionated on which cutting is the best to buy.  Although there are some differences in the cuttings, the quality of the hay is much more important than the cutting.  From a nutritional standpoint, all cuttings can result in prime horse hay.  With alfalfa, there will be some variation in protein content between cuttings.  First cut alfalfa hay has the reputation of having large tough stems, but this is only true if the hay was too mature when cut.  If first cut hay is mowed at the pre-bloom stage, the stems will not be coarse and the nutritive value will be high.  Weeds do tend to appear in first-cut hay.

     Second cut alfalfa hay is usually the fastest growing because it is developing during the hottest part of the season, and it usually has more stem in relation to leaf.  Of all cuttings, second cut tends to be the lowest in crude protein, but its 16 percent average is adequate for all classes of horses.

     Third (and later) cut alfalfa, develops a higher leaf to stem ratio because of the slower growth during the cool part of the season.  Therefore, third cut hay will usually have the highest nutritive value.  Horses which are not accustomed to a good, leafy hay may experience flatulent (gaseous) colic or a loose stool.

     Mixed hays from all cuttings will have similar nutritional values except that with a grass/alfalfa mix, the first cutting will contain a larger proportion of grasses than the other cuttings.

     Most hay today is mowed, conditioned (stems crimped so they will dry faster), and put in a windrow all in one operation.  This results in less manipulation of the hay and less leaf breakage and loss.  The hay dries in the windrow until the moisture is out of the stem.  The level of dryness can be determined by twisting a handful of the hay.  If the stems pop as they break the moisture content is about right for baling.  Scraping the green covering off a stem will also reveal if the stem is still wet.

     Raking or turning the hay in the windrow rolls the hay from the bottom of the pile to the top.  This may be necessary in humid climates, for hay that has been rained on, or with a field that had an unusually dense stand so is laying in heavy windrows.  Raking will facilitate further drying but may contribute to leaf loss.  It is essential that raking be done when the hay has adequate moisture, such as with an early dew, which will prevent leaf shatter and loss.

     Bale size is dictated, for the most part, by the bale wagon being used, with the currently popular wagon requiring a 40 inch long bale which weighs approximately 65 to 70 pounds.  The tightness of the bale can be adjusted.  Tight bales handle well, stack well, and shed weather better.  A too-dry bale must be baled tight in order to retain its leaves but too-wet hay that is baled tight will result in heating and molding.

     Once the hay in the windrow is determined to be at the appropriate moisture level, the hay should be baled with the aid of the morning dew to help hold the leaves on the stems.  This may require the hay grower to get up at 3 AM and bale for the few hours when baling is optimum.  Baling throughout the heat of the day simply does not result in good quality hay in most situations.

     Bales are generally left in the field for a few days to cure or sweat, particularly if there was adequate dew on the hay during baling.  Often the need to irrigate the next cutting requires that the bales be gathered.  Stacking today is generally done with bale wagons which result in tight, stable stacks with staggered joints.  A tall stack results in fewer top and bottom bales which are the ones commonly lost to weathering and ground moisture.  Side bales generally do not get drenched during a rain so dry out adequately.  The middle bales are protected.

     If the bales contain too much moisture, they can ferment and create heat.  The heat can be great enough to result in spontaneous combustion causing a stack to catch fire.  The internal temperature of a bale can be checked by simply cutting the strings and passing the hand between some flakes.  Any warmth should be noted as heat makes undesirable changes in the carbohydrates in the hay.

     Since the nutritive quality of hay can vary so greatly, it is best to test hay before a large purchase, especially if it is to be used for young or lactating horses.  Your extension agent will instruct you on sampling techniques and the test results will reveal crude protein, fiber, energy, and mineral content. 

Convenient.

Convenient.

A WISE STUDENT OF AGRICULTURE

A wise student of agriculture posted this sweet and to the point missive:

the scoop is….

there are 10,000 variables between “cuttings” that cannot be figured into the modern world

in the old days we had first cutting…sometime in may(ish) and another sometime after the summer broke and before winter started

the common logic was that the fields grew from the end of second til the start of first and being “aged” in the fields had more stem,more fiber,less yummies and so on….

the “second” cutting was then a much “younger” crop growing only a few mos (4 was best) and then being suppressed by summer for part of the time so maybe you only had 60 days of active growth…younger was fresher and less fibrous and greener and higher in protein…

but if a farmer burns off the winter stubble in early spring, then the “first” cutting is only that same 60 days old and has the same characteristics of a young crop …likewise if a farmer refuses to do anything for summer weeds the “second” cutting while younger is riddled with garbage

and if we start talking about multi cuttings things get even more complex…but mainly you are look at the age between mowing down and cutting another time...and not where the hay falls in the sequence of cuttings…esp since farmers across the nation can send hay anywhere the freight will pay…

so as they say on the Rec “It depends”


bucolic

bucolic


‘TIME OF DAY’ OF CUT MATTERS  (linked here)

“Time of day in cutting can also make a difference in quality of hay. Hay cut in the late afternoon has higher nutrient content than hay cut in the morning. The plants accumulate sugars and starches during the day, through photosynthesis, and then use up these nutrients at night as they grow, he explains. Thus for highest nutrient values, select hay cut in late afternoon, but for an idle horse, morning cut hay might be just right. A horse that is prone to insulin resistance problems or laminitis would do best with hay cut in the early morning when the plants are lowest in sugars and starches.”

(So test your hay for WSC plus starch for IR or Cushings horses.)

Looks great...

Looks great… but the stacks aren’t perfectly aligned.  My OCD is kicking in here…

MY CONCLUSION – TEST YOUR HAY – Dairy One.

It doesn’t really matter what ‘cutting’ you purchase.  What matters is the ability and sense of the farmer.

So, go look at the hay you are buying.  Make your best judgement.  And, if you are like me and have sensitive horses (Cushings/IR) or athletes, get it tested.

Dairy One makes it very easy to test hay.  I do it all the time.  Here is the link.

And, supplement your forage when needed.  There are so many diverse, quality feeds out there… just make sure you aren’t buying filler or fast food for horses.  😉

This is a shot from the Dairy One website - they test hay easily and accurately.

This is a shot from the Dairy One website – they test hay easily and accurately.

The post 1st, 2nd or 3rd cuttings in hay… what does that really mean? appeared first on Horse and Man.

HORSE AND MAN is a blog in growth… if you like this, please pass it around!


newrule2

JEWELRY THAT BENEFITS THE BUCKET FUND HORSES! Every donation counts! Click image to see the new pieces!

JEWELRY THAT BENEFITS THE BUCKET FUND HORSES! Every sale counts! Click image to see the new pieces!

Click here for webpage, click here for Facebook!

ALL PROCEEDS SUPPORT THE BUCKET FUND!

Fabulous CHUNKY Turquoise necklace/bracelet!     Only $64!
Beautiful greenish blue turquoise rectangle pillows with sterling wrapped ring and lobster clasp closure. Such a value – elegant squares! 17.5″
Screen Shot 2015-04-28 at 7.29.37 PM Screen Shot 2015-04-28 at 7.39.47 PM

Riding Warehouse

Your purchase with R.W. through this link helps the Bucket Fund!


When you shop @AmazonSmile, Amazon will make a donation to Horse And Man Inc.

Supporting The Bucket Fund through Amazon Smile


Supporting The Bucket Fund through Amazon Smile is HUGE for the horses. Please choose HORSE AND MAN when you make your Amazon purchase through this link. THANK YOU!

Style Showcase 16

Hi friends! I haven’t shared an update since last week, but we are plugging along on the bathroom renovation. It’s been slow going the last week. Our original choice of a countertop (which was being installed last Wednesday) was cracked during fabrication so we had to make another choice and that took a few days to figure out. Installation is tomorrow for the new countertop, so we are rocking and rolling now. We had to wait until the counters are in before that wall of tile can go up, so I’m really hoping to wind up the contractor’s part on Friday and then we will take over and finish what we need to finish in there. Whew, bathrooms always take much longer than you think they are going to! I don’t know when a reveal post will be up, but I can’t wait to get there. Four weeks of renovation will wear you out, although I know some of you have been through much more than that. 

Every Tuesday, I’m joining this great group of ladies who are sharing more decorating inspiration with you. Many times it will be seasonal, but always good information that you may be interested in. These posts are meant to be inspirational, introduce you to other blogger friends, and add extra postings when I normally don’t post on these days, so I hope you enjoy!

The post Style Showcase 16 appeared first on Southern Hospitality.